Monday, December 27, 2010

Oh Cranberreeeee! Oh Cranberreeee


The unassuming little cranberry. 
Forsaken for most of the year, the little guy slides into the spotlight for two short months when it either slides out of a can, or is cooked into a sauce...and then before you know it is gone again. Oh sure, you come across it in juice form--an option on those airline flight attendant beverage carts. But that's kind of it for the tart and delightful cranberry. It's so unfortunate, really, to be perceived in such a limited way.

Every Thanksgiving I look forward to making my trusty cranberry sauce recipe. It's nothing fancy, just fresh berries, sugar, orange juice and orange zest that come together beautifully each and every time, while filling the kitchen with a wonderful, zesty holiday aroma. You can't help but love it when something so easy to cook delivers every time. But my brainstorm this year had to do with some leftover sauce that week after Thanksgiving. It completely perked up a batch of Irish oatmeal, drizzled on top along with some vanilla yogurt. And it got me to thinking...I should make another batch of cranberry sauce, just to use on oatmeal this winter.

There was also the matter of a cranberry shortbread recipe I found in an old issue of Gourmet. I desperately wanted to give it a shot, but had way too much on my plate, so to speak, what with the rest of the cooking for the Thanksgiving meal. So, I turned to my baking goddess sister-in-law, C. She of the impeccable shortbread baking skills would surely want to give this recipe a spin, I thought.  She kindly agreed and sure enough, her cranberry squares were my favorite part of the dessert spread this year.

And then, as I was planning the holiday menus for Christmas, yet another recipe caught my eye...featuring, of course...the cranberry.

I was flipping through a favorite baking book—Rustic Fruit Desserts—looking for something that would be good with brunch or afternoon tea on Christmas Day. Lo and behold! A gorgeous photograph good enough to eat of something called Cranberry Buckle with Vanilla Crumb was virtually calling my name.

Now I don't know about you, but I just don't make 'buckles'. (sigh... Eastern European baking heritage sadly does not include buckles.) And actually, until my friend, K. gave me the book for my birthday, I had never made a 'slump' or a 'pandowdy' before either and those were a big hit. This buckle featured my new hero...the cranberry, so I figured why not give it a try?

And, of course, the buckle was nothing short of amazing! (Actually everything I have baked from Rustic Fruit Desserts has been stellar.) You layer fresh cranberries in the center of a sour cream-based, orange zest-scented batter and then sprinkle them on top as well, where their tartness perfectly balances a crumbly, vanilla-scented topping. It's a beautiful marriage of flavors, and one I'm thrilled to add to the fleeting cranberry season repertoire.

And so with just a couple weeks of cranberry season left, take this chance to check out the cranberry's multi-faceted personality. You'll never think of it as just another can of juice on an airplane again!

Cranberry Buckle with Vanilla Crumb
(adapted from Rustic Fruit Desserts by Cory Schreiber and Julie Richardson)
Serves 8 to 12

NOTE:  There are two components here, essentially, the cake batter and the streusel-y, crumb topping.  You could make the crumb topping the day before or even weeks before and just keep it in the fridge.  That's what the book suggests, and based on how tremendously delicious it is, that's what I plan to do.  That way you have topping ready and waiting in your freezer, when, on a whim, you decide to throw some apples or pears together for a quick fruit crumble.  In my case, I made a half batch just to use with this buckle, so that's the recipe I will give you here.  If you want to make the full batch, simply double everything.

For buttering the pan:
1 tablespoon of unsalted butter, at room temperature

For the buckle:
1 3/4 cups all-purpose flour
2 teaspoons baking powder
1/2 teaspoon fine sea salt
1/2 cup (4 ounces) unsalted butter, at room temperature, or very lightly softened
3/4 cup granulated sugar
zest of one orange
2 eggs
1 tablespoon pure vanilla extract
1/2 cup (5 ounces) sour cream
2 cups (8 ounces) fresh cranberries

For the Vanilla Crumb:
1/2 cup all-purpose flour
1/3 cup granulated sugar
1/8 cup packed light brown sugar (yes, that's half a 1/4 cup measure!)
pinch of fine sea salt
2 ounces cold unsalted butter, cut into 1/4-inch cubes
1/2 tablespoon pure vanilla extract 

Pulse everything BUT the vanilla in a food processor, until the mixture is crumbly.  Add/stir in the vanilla by hand.  The mixture keeps up to three months in the freezer in a ziploc bag or airtight container.


Preheat your oven to 350 F and butter a 9-inch square baking pan.

Make the buckle batter:
Sift the flour, baking powder and salt together in a bowl.
Using a mixer (stand or handheld) cream the butter, sugar and orange zest together on medium-high speed for 3-5 minutes, until light and fluffy.  (I know...seems like a long time, but really, it's important.)
Add the eggs one at a time, scraping down the sides of the bowl after each addition.
Stir in the vanilla.
Stir in the flour mixture in three additions -- alternating with the sour cream in two additions.  
Begin and end with the flour and scrape down the sides of the mixing bowl occasionally.

Spread the mixture into the prepared pan.  
Distribute the remaining one cup of cranberries over the top and then sprinkle the crumb topping over the cranberries.

Bake for 45 to 50 minutes, or until lightly golden and firm on top.

Store cake wrapped in plastic at room temp for 2 to 3 days.


Wednesday, November 17, 2010

The Other Side of Thanksgiving


Oh, sure...we could be talking about cranberry sauce right now...or rehashing the old pecan vs. pumpkin pie debate.  Or, maybe I should try to persuade you of the wisdom of a dry brine, but no...well actually, I can't help myself...I think I will reference an article below about dry brining a turkey, you know...just to get you to consider it. 

Really though, I think it's my duty to remind you all of an important point about Thanksgiving.   
There are those other meals.

I had to learn this the hard way years ago.  Having spent weeks before Thanksgiving studying all the November issues of the cooking magazines and going through my shelves of cookbooks, I was obsessed with my grocery list for the big meal.  I checked and re-checked my ingredient lists.  I did several rounds of grocery shopping at different stores to round up everything we needed.  We were going to have a house full of family members and were cooking dinner for 16 or 18--I can't really remember the exact number--and I worried about the turkey...and the side dishes...and the pies....and everything really. 

And, then, you know what happened?  My brother-in-law walked into the kitchen around noon on Thanksgiving.  He was hungry and wanted to make a sandwich.  And, umm...actually...there was nothing to eat.  Right then.  I mean...later, yes, there would be plenty to eat...but in that very moment?  Uh, there was nothing ready and I realized that I never thought about anything outside the main meal, which is kind of silly, because, people actually do get hungry before the Thanksgiving meal...and then, too, the next day, and the next...and, if they're staying with you for the weekend, well, there's that too.

Yes, Thanksgiving is about that big deal with the turkey and everything, but then, it's kind of about the little meals here and there you'll be sharing with your family and friends over those couple days too.

Sandwiches are an easy way to have a snack earlier in the day on Thanksgiving and will help everyone keep from getting too crabby while waiting for the main event.  Trust me on this.  I stock up on some sliced salami or prosciutto and crusty baguette for a little change from all that turkey we'll all be eating over the next several days. 

Breakfasts are nice to share with family that's visiting over a holiday weekend.  Make sure you've got enough coffee, milk, fruit and cereal.  Figure on cold pumpkin pie (oh.  is that just me?) or cold cereal that following Friday morning for sure...but maybe shoot for something a little more fun on Saturday or Sunday...I've talked about pancakes here before...and frittatas are lovely as well, but here's something I tried last month that I think I'll make again next weekend after the holiday:
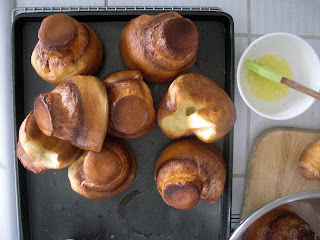
sugared popovers.

Popovers are delightful because they're easy, but make a bit of a show-off-y splash when you pull them out of the oven with their crisp, golden bubble tops.  A spin-off of the savory Yorkshire pudding, a popover's eggy dough is a natural partner for any kind of jam you'd care to slather on, making them perfect at breakfast time.  These sugared puffs take popovers a delicious step further.  Developed by David Lebovitz for a New York Times article on a 1966 Maida Heatter recipe, they're like what would happen if cinnamon toast married a doughnut and had kids.   You whiz the batter together in the blender, then pour and bake in a muffin pan.  Ridiculously easy, but with an awesome 'wow' factor.

My own Thanksgiving planning is in full swing.  The menu is coming together.  I'm going to be making the chutney this coming weekend.  And, yes, I've got the deli meat, bread and chips on the grocery list...
Happy Thanksgiving everyone.

*          *           *           *          *


Sugared Puffs
adapted from David Lebovitz
(makes 9 to 10 puffs)

Softened butter for greasing the muffin pan
For the puffs:
2 tablespoons butter, melted
3 large eggs, at room temperature
1 cup whole milke
1 teaspoon salt
1 1/2 teaspoons sugar
1 cup flour

For the sugar coating:
2/3 cup sugar
1 teaspoon ground cinnamon
4 tablespoons butter, melted

Preheat the oven to 400 degrees.  Grease a non-stick muffin pan (or popover pan if you've got one) with softened butter.

For the puff batter:  
Combine 2 tablespoons melted butter, eggs, milk, salt and sugar in a blender and pulse for a few seconds.  
Add the flour and pulse for 5-8 seconds, just until the batter is smooth.
Pour into the muffin tins, filling each cup about half way.
Bake for 35 minutes, until the puffs are a deep golden brown.

Remove from the oven and wait a few minutes until cool enough to handle.  

Mix the sugar and cinnamon in a medium bowl.
Remove the puffs from the pan and brush with melted butter and then dredge in the cinnamon sugar mixture to coat.  Let cool on a baking rack.

Share with your house guests.

*          *           *           *           *
 
Talking Turkey
Yes, I've tried brining, but all the wrestling with the bird, the bucket and making room in an already overstuffed Thanksgiving time refrigerator kind of wore me out, so I threw in the towel.  Until last year, when I tried the same technique I use with roast chicken--simply salting the bird a few days in advance--on the turkey.  Success!  And no giant bucket of salted water to contend with.  
Here's a link to the recipe, if you'd like to give it a try. 

 http://www.latimes.com/theguide/holiday-guide/food/la-fo-saltedturkey,0,3863680.story
 

Saturday, October 23, 2010

A Staycation


I remember when I first heard the term "stay-cation".  It was not long after the markets crashed a couple years ago.  The news was full of stories of families staying put and economizing by skipping the expensive 'travel' vacation and pitching tents in their backyards, visiting local museums and playing mini-golf in their hometowns.

You have to admit...there is something very appealing about staying put.
No packing a full wardrobe into a regulation size wheelie bag.
No airplanes, airports or awful security lines.
No need to stop the paper or board the dog and you water your own plants.
And you sleep in your own bed!  
I could go on and on... 

After last year's Sicilian extravaganza we thought...why not give stay-cationing a try?
So we spent a week at home last month and I'm happy to report, it was an absolute delight!

Now, granted...we live in a city that is truly lovely.  People from all over the world come to visit
San Francisco and there was no shortage of things to do on our stay-cation.

There was a day trip to Santa Cruz...  (Funny how all oceanside towns are, umm, the same...)
...and an afternoon at SFMOMA ogling the vast art collection accumulated by the Gap founders.  (Why buy one Calder when you can buy 23?)


We breezed in to Bi-Rite Creamery on a Tuesday afternoon and enjoyed our favorite local ice cream.  (And there was no line to wait in!!  Seriously.  NO line!!)

There was a tasty mid-week lunch at Tyler Florence's new restaurant and then... a nap.
(That's what we get for having fried chicken and steak-and-eggs at noon!)

We walked our dog.

We had one of the best meals ever at Ubuntu, a Michelin starred vegetarian restaurant in Napa. (If you live here or visit the area I beg you to go.  It will rock your world.)
We even hiked Angel Island, the small state park in the Bay with gorgeous 360-views.  Something we've always wanted to do.  (Anything that includes a ferry ride is a-okay in my book!)


It was a splendid week, but that's not really what I'm here to tell you.

What I discovered was that the true beauty of a stay-cation is it allows you time to putter.  And that, people...is a glorious thing.  Who has time to just putter around any more?  And I mean really putter.  To spend a lazy morning, sipping (not slurping or slamming) your coffee, flipping through a magazine (yes...a magazine...printed on paper...no laptop required!), listening to music while something bakes in the oven?!  Oh, it's the stuff dreams are made of, I tell you!

So during this stay-cation I spent an hour or so one morning puttering...while making a batch of granola.  Yes...homemade granola.

Now you could say this is one of those things that is fine to just buy pre-made, in boxes at your local supermarket.
And I would tell you that you are wrong.

Homemade granola is an entirely different and much, much more delicious thing.  Sprinkled into yogurt or over pancakes...even eaten out of hand, it is fantastic.
It's like...if there is a choice between pre-made-boxed granola and, well...nothing...
I would choose nothing.
Because homemade granola is totally in-another-stratosphere in comparison.

But let me reassure you...it's not something that you need a stay-cation in order to make.  No, no...not at all.  I'm just saying should you have a weekend morning free or you just want to cheer yourself up some evening after dinner.  The warm, toasty aromas of nuts and oats browning in the oven...wafting through your kitchen as you read a novel or watch a movie or catch up with a friend on the phone. 

It's the perfect way to create a stay-cation frame of mind.


*          *           *
The great thing about homemade granola is that it can be customized to taste with your favorite combination of dried fruits and nuts.  Mine is dried blueberries, golden raisins and almonds, but the possibilities are endless.  Just go and stand in the dried fruit and nut aisle at Trader Joe's and let your imagination run wild.

If I haven't said it before...thank heavens for my SILPAT mats.  The silicone baking sheet liners make things easy when you stir the granola.

Homemade Granola
adapted from Baked
(makes approx. 1 pound)

2 cups rolled oats
1 teaspoon cinnamon
1 teaspoon salt
3 tablespoons vegetable oil
1/4 cup honey
1/4 cup firmly packed light brown sugar
1 teaspoon pure vanilla extract
1/3 cup whole almonds
1/3 cup sliced almonds
1/3 cup dried blueberries
1/3 cup golden raisins

Preheat the oven to 325 degrees.

Toss the oats with the cinnamon and salt in a large bowl where everything will end up.
Using a medium bowl, whisk the oil, honey, brown sugar and vanilla until thoroughly combined.

Pour the honey mixture over the oats and using your hands or a plastic spatula or scraper mix everything together until well coated.
(If you like your granola a bit clumpy, squish the mixture into clumps with your hands and make a fist before letting go.)

Pour everything onto your baking sheet.  (If you don't use silicone mats line your baking sheet with parchment paper.  You'll thank me come clean-up time.  Granola is a bit sticky.)

Bake for 10 minutes then stir and turn the granola before adding the nuts -- sprinkle those on top.
Return to bake for another 5 to 10 minutes.
Remove from the oven and add your dried fruit before stirring again.

Cool the granola on the baking sheet completely before transferring to an airtight container.
should last for a week...theoretically...but, it's gone in two days around here.


Monday, August 30, 2010

Finally

So it was hot here last week.  

Finally. 

There's been a lot of grousing about the weather here in Northern California for the past couple months.  Summer is a bleak time in the City of Fog, but this has been the coldest summer on record in, like, the past forty years.
My husband and I joke that the thermometer seems permanently stuck...at 57 degrees.
And it's August.

For those unaware of of the total lack of summer here, I give you Mark Twain's famous quote:
"The coldest winter I ever spent was a summer in San Francisco."

I was reminded of just how strange this is not long ago when I was telling a friend who lives in New York about a particularly good batch of Bolognese sauce I'd made recently and she said, "ok, I can't even listen to you describe this because it's too damn hot."  It reminded me of all those great hot weather recipes I used to rely on and I had a wave of  sentimental longing for true summer heat.

Then things turned around a few days ago and the temperatures shot up into the 90s.  We were having a little Bay Area heat wave and turning on the oven or stove was out of the question.  Ahh, the good old days, I thought, and then ran through my old hot weather cooking repertoire in my mind.  Ha!  It was time for a salad.

The salad I'm going to tell you about is essentially an attempt to recreate a beloved pub salad from a favorite Chicago hangout of ours. A piece of grilled flank steak, sliced thin, is served on a crisp salad of romaine leaves, radishes, tomatoes and mushrooms served with a blue cheese dressing.  That's it...so easy.  So tasty.

And let me assure you, this salad is perfect for a hot day.  Romaine has a cool, crisp snap that can hold up to creamy dressing and grilled beef.  (And I'm here to tell you Romaine gets a bad rap in this era of fancy mesclun greens and heirloom varieties of arugula.  Often, there's nothing better for a composed salad.)

Then there's the perfect flavor combination of beef, tomatoes and blue cheese dressing.  Simply put, they were meant for each other.  It's the season for tomatoes and we've been stuffing ourselves with the sweet 100s and little grape tomatoes that are plentiful this time of year.  Oh, and don't let me forget... radishes.  I'm crazy about radishes, and their peppery bite is exactly right here.  Chives are a lovely addition, because, well, because I have a chive addiction.  They make anything, better.  The nice thing is, a composed salad is ideal for improvising...so feel free. 

As for the dressing, let's just say you can't go wrong if you make your own.  I won't be upset if you buy a jar of Trader Joe's Blue Cheese dressing, because I've done it myself, and frankly, it's not bad.  But the version I've been making for the past year (thank you Cook's Illustrated) has the bonus of having the perfect balance between creamy and tangy while allowing you to feel the tiniest bit of Martha-Stewartish-I-made-homemade-salad-dressing smugness...and that's always kind of fun.

I pulled all the stops out that one hot, steamy evening. (There were actually two, if you'd like to know.)  I put on a tank top and some shorts when I got home and assembled the salad.
Even had a gin and tonic.
What the heck.
When summer comes around only a couple of days each year, you've got to make the most of it.

Pub Salad
serves two
adapted from The Four Farthings, Chicago, Illinois

a steak (your choice, flank, skirt, or a nice NY Strip, which is what I like to use), grilled or broiled

Romaine lettuce, about half a head, rinsed and spun dry
tomatoes, whichever variety you're partial to
white button mushrooms, thinly sliced
radishes, thinly sliced
other options:  some sliced red bell pepper or thinly sliced red cabbage

For the dressing (adapted from The New Best Recipe--Cook's Illustrated):
2 1/2 ounces blue cheese, crumbled (about 1/2 cup)
3 tablespoons buttermilk
3 tablespoons sour cream
2 tablespoons mayonnaise
2 teaspoons white wine vinegar
1/4 teaspoon sugar
1/8 teaspoon garlic powder or garlic salt*
salt and ground pepper

Mash the blue cheese and buttermilk in a small bowl with a fork until the mixture resembles cottage cheese with small curds.  Stir in the rest of the ingredients and taste to adjust the seasonings.

* I use a lovely Garlic Salt blend from my favorite spice shop in Chicago which gives the dressing a nice bit of zip.

Assemble the salad:
Tear the lettuce into bite size pieces and layer the remaining ingredients with the lettuce.  Top with thin slices of grilled beef.

Drizzle with dressing.

Have a sip of an icy cold beverage and tuck in.


Monday, August 9, 2010

A Cheese Odyssey

 It's been a busy summer.

My 'project' as I call it, got its start back in May when my sister-in-law was describing her plans for summer activities with my niece and nephew.  Her plan for their summer vacation sounded impressive and would provide more than enough fodder for the standard How I Spent My Summer Vacation report come September.  (That's so retro, right?  I'm sure that now, instead of a quaint report, fourth graders prepare short films which they then post on YouTube.)  There were to be hikes in and around some of the local prairies and woods...visits to farms to learn about sustainability (they've been particularly interested in learning about where their food comes from...sniff...I am so proud!) and ongoing music lessons.  Not to be dorky, but it sounded kind of fun.  I wanted to hang out and tag along on some of the field trips they had planned. 

On the plane ride home I thought about their summer plans and wished for my own summer program.  And that was when the light bulb went on.  (Yep...a cartoon-like light bulb idea bubble pretty much popped up over my head.) Why not create my own summer program?   I would make up a syllabus of on my own terms and take field trips whenever I wanted.  There would be some light reading (to balance out my usual summer diet of trashy beach books) as well as some hands-on practical experience...and I had the perfect field of study in mind:  cheese.

Cheese is a wonder and, well...it's always been there for me.  Even as a fussy child, cheese was the one thing I could be counted on to eat, and it didn't have to be mild--in fact, the stinkier, the better.  As a teen, a grilled cheese sandwich was my go-to snack (with the obligatory bowl of Campbell's tomato soup).  As an adult, the joy of discovering locally made artisanal cheeses to rival the best France has to offer has been a thrill and a source of pride.  (Yes, we do make things in America!) 

It was time to learn more.

J., a friend at work who loves cheese probably as much as I do, discovered The Cheese School...right here in San Francisco.  Imagine that.  We took our first class together -- Basic Cheese Primer -- in the school's pleasant teaching area set with long dining tables. 

There were place cards and Cheese School pencils and at each place a lovely plate holding twelve samples of cheese, arranged like the face of a clock.  White and red wine was served and the instructor, a very knowledgeable former cheese shop owner and local Bay Area cheese competition judge, took us on a tour through the ancient art of cheese making.  What took me by surprise was how similar making cheese is to making wine.  How the essence of the earth, the animal and its environment is captured in the flavor of each cheese -- the very idea of terroir as applied in wine is the same for cheese.

An even bigger surprise was the very first cheese featured in our discussion...parked on the plate at twelve o'clock -- ricotta.  It was sitting there in a little ramekin, minding its own business, looking very unassuming as I sighed.  Seriously?  Ricotta?  I'm going to be tasting, ricotta?  I admit to having serious doubts about The Cheese School in those first few minutes, because, people...ricotta is that chalky stuff that hangs out in lasagne.  For crying out loud...it's the nondescript blah cheese that fills cannoli.  I sat there thinking, what the hell is ricotta doing on my plate? 

The instructor told us how all the cheeses we would be tasting were at room temperature.  Very Important Note.  Cold Cheese is Tasteless Cheese. But I already knew that.  What I did not know was that this little blob of ricotta -- sheep's milk ricotta, actually...from Sonoma County...was about to rock my world.  Oh heavens.  This was not my mother's ricotta.  That stuff comes in plastic tubs and squeezes out, retaining the shape of said tub, with a sucking sound before plopping into your bowl with a bland, watery thunk.

This cheese...sheepsmilk ricotta from Bellwether Farms...was not like any ricotta I'd ever tasted.  It was tangy.  It was creamy.  It was, in a word...luscious.  I did not want to stop eating it.  With one delicious spoonful, it crushed my dismissive perception of ricotta and established itself as unique and unforgettable.
Cheese as art form.  

Each cheese we tasted that night confirmed this idea...embodying all the subtleties and beauty of food made with care and integrity and often using methods that have been around for ages. 

But the ricotta in particular was a stunner.  I couldn't stop thinking about it.  Last month I stopped by one of my favorite cheese shops, Cowgirl Creamery, and bought the same ricotta.  The goal:  to recreate an appetizer we had in Sicily last year -- a kind of ricotta fritter.  A recipe in one of Jamie Oliver's books seemed to have the right mix of ingredients, the way I remembered it, and I mixed up a batch before dinner that Saturday night.


It's nothing complicated really...a little flour, egg and grated parmesan are mixed with the ricotta and then fried up in a non-stick pan coated with a slick of hot olive oil.  As you're frying up these golden little cakes of cheese, you will be reminded that often, the simplest things are the best.  The ricotta is transformed into something golden and crisp on the outside and meltingly silky and wonderful when you take a bite.  With tomato season in full swing, I followed Jamie's suggestion to serve the fritters with a little tomato salad -- chopped summer tomatoes, fresh basil and a fresh red chili tossed with some good olive oil and red wine vinegar -- and it made the perfect tangy, summery complement. 


So I'm thinking now that The Cheese Odyssey should continue past summer.  I mean, who knew?!  Ricotta...a revelation?  Fried cheese...a complete delight!  There is so much more to discover. 

Next up, I'm going to try Home Cheesemaking. 
And, I'll start with a ricotta. 
Imagine that.

*          *          *

Ricotta Fritta con Piccola Insalata di Pomodori
  aka Fried Ricotta with a Little Tomato Salad
adapted from Jamie Oliver's  Jamie's Italy
(this full recipe serves 6, but it worked well when I halved it)

For the cakes:


1 lb. good ricotta cheese
(Here's where I beg you...mail order...or, ask at your favorite cheese shop...just do your damnedest to    find some good, locally made ricotta.) 

2 tablespoons freshly grated Parmesan cheese, plus extra for serving
1 1/2 tablespoons flour
sea salt and freshly ground black pepper
1 large egg

For the salad:
1 cup of summer cherry tomatoes -- sweet 100s are my favorite
2 sprigs fresh basil -- use both stems and leaves!
1 fresh red chili, deseeded and finely chopped
1 tablespoon extra virgin olive oil
2 teaspoons of red wine vinegar, or to taste


For the fritters:
Mix the ricotta with the Parmesan, flour, a good pinch of salt and the egg.  Season with a little freshly ground black pepper and place in the fridge -- it helps firm up the batter.  (Ridiculously easy, no?)

Make the salad:
If you're using cherry tomatoes, cut them in half and toss into a mixing bowl.  (If you're using regular size tomatoes, you'll want to get ride of the seeds and chop the tomatoes into small chunks.)
Finely chop the stems of the basil and tear the leaves up roughly.  Mix them in with the tomatoes and then toss in your chopped chili pepper.  Season with salt and pepper to taste and toss with the olive oil and vinegar.  Set aside until you're ready to serve -- the mixture will just get more lovely and juicy.

Heat your nonstick pan over medium heat and add a small splash of olive oil.  Drop spoonfuls of the ricotta mixture into the pan -- don't overcrowd -- you want to get some nice golden color to the cakes.
Fry the ricotta cakes for a couple minutes and then carefully turn them over when you see they're turning a golden brown.  (I found a flexible silicone spatula did the job well here.)
Fry on the other side for another minute or so.

Serve right away -- everyone will be loitering in the general vicinity as you are frying these up because the smell is simply heaven!

Sprinkle with a pinch of sea salt and a tiny grating of fresh nutmeg.  (Yes, I said fresh nutmeg.  It's not that big a deal.  Get a couple real nutmeg pods, or whatever they're called, and keep them in a little airtight spice container.  Couple swipes on the old microplaner and you're talking indescribably delicious addition to many Italian dishes.)

Serve with a spoonful of the tomato mixture on the side.  Drizzle with a little of your fanciest, peppery olive oil and grate a bit of Parmesan over the top. 

Prepare to be amazed.

Sunday, June 13, 2010

Bring a Bundt!

We went to a friend's place for a barbecue and some ping pong yesterday afternoon.

What?  Ping pong, you ask?  You didn't know that ping pong is making a huge comeback?!  Well it is.  Or at least I think it is.  If you have a ping pong table hidden away somewhere in the basement or garage, do yourself a favor and bring it out.  It'll take you back.  In a good way.

Yesterday afternoon's get-together was the type where everyone pitched in and brought something, which is always nice.  You know...share the cooking.  The hosts had things set up to grill (and the ping pong table, paddles, etc...ready) and the rest of us brought beverages, side dishes, snacks and dessert.
So kind of a 'retro bbq' with the whole ping pong thing, but so was the dessert I brought:  a bundt.

Now a bundt is one of those things that perhaps doesn't readily spring to mind when you're thinking about what to make for dessert.  If it was 1978 it might, but sadly, the bundt seems to have gone the way of the avocado-colored kitchen appliances and the rotary dial phone.


I've always loved bundt cakes.  As I've said before, I have a tremendous fondness for old-fashioned American desserts.  Maybe you remember this scene from My Big Fat Greek Wedding...it had me in stitches.  Let me reassure you that in my experience, this is not the typical reaction you get when you show up at someone's house with a bundt cake in hand.  People love bundt.  Ever hear of the classic self-help book How to Win Friends and Influence People?  Well I'm here to tell you it should include a chapter on the magical powers of The Bundt!  Appear on someone's doorstep with a bundt cake and you will have the world at your feet.  No joke.  It seems the effusive affection for bundt is not mine alone.  Bundt seems to bring back good memories for all.  There's something approachable about a bundt -- it's not complicated and fussy like a layer cake with all that frosting.  I've been bringing bundt cakes to various friends' parties and gatherings over the past year and I've found it's the surest way to achieve universal love and acclaim.  Oh.  And lots of oooh's and aaaah's too.
As a Leo, I like that sort of thing.

Now that I've convinced you to bring a bundt along to your next pot luck (...or what the heck, make one for dessert at home!) go dig around in your cabinets and track down that bundt pan you've got tucked way in the back.  (No judgment there -- I bought mine years ago, with good intentions, and then proceeded to completely ignore it for years.)

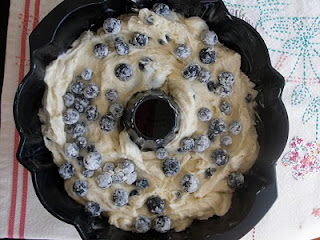
I have a wonderful bundt recipe to share.  Previously, I've had great success with an excellent Chocolate Sour Cream Bundt from Cook's Illustrated that's dense and perfectly rich and chocolatey.  (Come now -- who doesn't simply adore a chocolate bundt?!)  But now that summer is here, I highly recommend a recent, smashingly good lighter-style cake:   Lemon Blueberry Buttermilk Bundt.   Perfect on a hot summer day, it actually improves over the course of a couple days and is equally delicious in the morning,  afternoon or after dinner.  (Maybe as a follow-up to grilled burgers?!)  The recipe is adaptable to a variety of berries or fruit, depending on what is in season.  I used blueberries, but the original recipe from Rustic Fruit Desserts, calls for rhubarb and lists cranberries as a good option too.  I think I'll try raspberries next.


The main thing to remember is to grease that pan extremely well with butter (or cooking spray), and then when you think you have every nook and cranny covered, go over the pan again.  EVEN if the pan is "non-stick".   The chocolate bundt recipe tells you to dust the greased pan with cocoa powder (pure genius, but that's those cooking nerds -- they think of everything!) to help with the release of the cake from the pan.  Other recipes call for dusting the pan with flour.  Whatever you do, take the time to be thorough with this step.  There's nothing worse than pulling the cake from the pan, only to feel it tear and pull away, a huge chunk still stuck to the pan.

So I urge you...if you don't already own a bundt pan, start scoping out the garage sales...and if you do...well, go out and spread the word:  Bundt is Back!

Lemon Buttermilk Bundt Cake (with Blueberries)
adapted from Rustic Fruit Desserts by Cory Schreiber and Julie Richardson
serves 10 to 12

NOTE:  I don't love a ton of glaze, so I halved the amount and simply drizzled for the look you see here -- for more glaze, double the amounts I have here.


1 tablespoon unsalted butter, at room temperature, for pan

CAKE
2 1/2 cups all-purpose flour
2 tablespoons all-purpose flour (for tossing with the fruit)
2 teaspoons baking powder
1 teaspoons fine sea salt
1 cup (8 oz.) unsalted butter
1 3/4 cups granulated sugar
Zest of 1 lemon
3 eggs
1/2 teaspoon lemon oil
3/4 cup buttermilk
1 pint blueberries (or 1 pound rhubarb, trimmed and very thinly sliced)

LEMON GLAZE
1 cup sifted confectioners' sugar, or more as needed
Juice of 1/2 lemon
1/2 tablespoon soft unsalted butter

Preheat the oven to 350 degrees.  Butter a 10-cup Bundt pan well.

Sift the flour, baking powder and salt together in a bowl.  Using a mixer, cream the butter, sugar and lemon zest together on medium-high speed for 3-5 minutes, until light and fluffy.  Add the eggs one at a time, scraping down the sides of the bowl after each addition, then stir in the lemon oil  Stir in the flour mixture in three additions alternating with the buttermilk in two additions, beginning and ending with the flour mixture, scraping down the sides of the bowl occasionally.  The batter will be very thick.

Toss the blueberries (or the rhubarb) with the 2 tablespoons of flour and fold half the blueberries into the batter.  Pour the batter into the prepared pan and sprinkle the remaining rhubarb on top.

Bake for 30 minutes, then rotate the pan and cook for an additional 30 minutes, or until the top of the cake is firm and the center springs back when lightly touched.  Cool the cake in its pan on a wire rack for 30 minutes before inverting and removing the pan.

To make the lemon glaze, whisk the confectioners sugar, lemon juice and butter together.  The mixture should be thick.  If it is not, whisk in another tablespoon or two of confectioners' sugar.  Spread the glaze over the cake as soon as you removed the cake from the pan.

Storage:  Covered with a cake cover or plastic wrap, the cake will keep at room temperature for 3-4 days.

Sunday, May 30, 2010

The Vacation Rental Blues


It just can't be... I thought to myself as I rummaged through cabinet after cabinet in the "rustic" kitchen of our Yosemite rental cottage last weekend.  Not a single saucepan in sight.  Nothing that could even stand in for a saucepan.  There was a bizarrely huge Pyrex measuring cup.  Three coffee grinders. (Really?  Three?  Why three?!) Two sad-looking little skillets.  A turkey shaped platter.  But no saucepan.  I sighed.  Typical vacation rental odds-and-ends.  Some improvising was going to be in order.

They say you can cook an entire meal with a single cast-iron skillet...and in my experience, this is indeed what one ends up doing when renting a vacation house with a "fully-equipped" kitchen.

Vacation rental kitchens pose serious challenges for someone like me. 
Yours truly  is a bit gadget-and-fancy-pans obsessed and the various vacation homes we have passed through with friends and family have consistently been a bit odd when it comes to the batterie de cuisine.

It never fails...one can always expect to find a trusty cast iron skillet.  That's a given.  And, then, a battered old enameled lobster pot regardless of how far one actually is from any ocean.  I've been in rental cottages in Wisconsin, where there's not even a remote possibility that one will be preparing a lobster for dinner, and yet, ha...there, lurking in a lower cabinet... the giant, blue-and-white speckled pot, a burnt patch permanently etched into the bottom.  Potato peelers are usually circa 1945.  You know the kind.  They're a bit rusty and hurt your hand when you use them.  Rubber spatulas are kind of icky and never totally clean.  Oh, and let's not forget the Corningware!  The ubiquitous Corningware baking dish with its cheerful blue flowers etched on the side and matching clear lid. Sometimes there will be a crusty, non-stick pan (an oxymoron, I know) and, until this past weekend, I've always encountered a 2- or 3-quart saucepan. 

But we all know it doesn't matter really because it's vacation, and you're relaxed and happy.   I've prepared some of the most memorable meals ever in the humblest of kitchens.  A grilled swordfish cooked in the rain on a tiny hibachi on Martha's Vineyard.  A hearty lentil soup for my extended family on a cold autumn night in Door County, Wisconsin.  Rabbit in Mustard Sauce on Christmas in a tiny Paris apartment.  (Note:  I have never come across a wacky lobster pot in a Parisian vacation rental...it's a uniquely American thing.)

So, there I was, last Saturday in Yosemite, without a saucepan.  It was our turn to cook dinner and I'd planned to make a simple risotto bianco with some grilled sausages on the side followed by a crisp tre colore salad (endive, arugula and radicchio tossed in a bright vinaigrette). 

Risotto is one of a handful of recipes I know by heart which is invaluable when one is vacation cooking.  It gives you a delightful blank canvas adaptable to any location.  Exhausted from a winter day skiing?   Plain risotto with cheese and a handful of herbs is the perfect warming welcome at the end of the day.  Or, maybe it's summer, and you're just down the road from a farm stand?  Risotto welcomes any handful of summer bounty you throw at it:  blanched fresh peas... asparagus... sweet corn...fresh herbs... tomatoes.  Perhaps you would never have guessed it, but risotto is the ideal vacation cooking item.

All you need is a some onion, chicken stock, a splash of white wine, a couple pats of butter, grated parmesan and the rice.  The best rice for risotto is a fat, short-grain known as arborio or the medium-grain carnaroli, and I keep a canister-full in the pantry at all times.  (A plastic bag of rice travels exceedingly well.)  The rice is sauteed with the onion in the butter, and then hot chicken stock is added, one ladle at a time, slowly over the course of about thirty minutes of cooking, so it's gradually absorbed by the creamy grains of rice.  The easy stirring during the cooking is simple to do while you're sipping wine and catching up with friends or family and there's always someone to hand the spoon off to while you grill up the sausage, or wash the lettuce.  My frozen container of chicken stock even acted as an ice pack in the cooler of food we brought along with us. 

Last weekend we improvised and heated the chicken stock in the giant Pyrex measuring cup in the microwave and the risotto turned out beautifully.  Extra tasty, in fact...as many vacation meals seem to be.   Magnificent surroundings and a happy group at the table are really all you need.


Risotto Bianco
adapted from Alice Waters' The Art of Simple Food
serves 4  (easily doubles to serve 8)


2 + 1 tablespoons of butter
1 small onion, diced fine
1 1/2 cups risotto rice
5 cups chicken broth
1/2 cup dry white wine
1/3 cup grated Parmesan cheese
Optional:  a couple tablespoons of minced fresh herbs like thyme, parsley, chives
Note:  for additions see below

1.  Melt butter in a heavy saucepan...or dutch oven...or enameled cast iron pot over medium heat.
Saute the onion until soft and translucent.

Meanwhile, bring the chicken broth to a boil in a separate pan and then turn off the heat.

2.  Add the rice and cook, stirring now and then about 4 minutes.  Do not let the rice brown.

3.  Pour the white wine over the rice and continue stirring until all the wine is absorbed.

4.  Add 1 cup of the warm chicken broth and cook at a vigorous simmer, stirring occasionally.  When the rice starts to get thick, pour in another 1/2 cup of the broth and add a pinch of salt (if you're using store-bought chicken stock, whick is already pretty salty) or a teaspoon of salt (if you're using homemade stock).

5.  Keep adding broth, 1/2 cup at a time, every time the rice thickens.  Do not let the rice dry out.
After fifteen minutes, start tasting the rice, for doneness as well as seasoning. 

6.  Cook until the rice is tender but still has  firmness, 20 to 30 minutes.  If you find yourself running low on chicken stock, just continue by adding water.  You'll be adding less and less as you get closer to finishing the risotto.  You don't want it to be soupy.

7.  When the rice is done stir in 1 tablespoon of butter and the Parmesan cheese and herbs, if using, turn off the heat and let the risotto sit for 2 minutes and serve.


Miscellaneous additions:
A handful of frozen peas is a great addition to risotto, as are fresh shrimp.  Add these about halfway into the cooking.
Fresh corn sliced off the cob or chopped fresh summer tomatoes are also fantastic and can be added about ten minutes before finishing.
Mushrooms can be sauteed and added both at the beginning and at the end.

Thursday, April 29, 2010

Weeknight Cooking

 I read an article today about cooking at home by my latest hero, Michael Ruhlman.  He makes the case for taking an hour at the end of the day to cook something and sit down to eat it, together.  His point is that "fast and easy" an idea pushed by popular food magazines, tv shows and the 'big food' industry is not really what the goal should be.  And I agree, to a point...

We all have those days.  I had one this week.  You know the ones where you're just simply tapped out by the end of the day?  Drained of energy, the thought of creating a meal is the furthest thing from your mind.  It's exhausting in and of itself.  Just the thinking part.  Familiar, right?  That's when "fast and easy" comes into play.  The way I try to get around the exhaustion is by picturing what I'd love to have someone (umm, that person will most likely be me...) put on a plate in front of me.  What am I hungry for?  What do I crave?  Just the act of picturing what I'd like to eat is usually enough to get me thinking...and then calculating what we have in the refrigerator or pantry...and then whether I should swing by the store for supplemental ingredients on the way home.  And before you know it, I've successfully avoided the dreaded Trader-Joe's-Frozen-Pizza trap.  No shame in that.  We've all been there.  But we can do better.

So, here's some 'fast-and-easy' and I'm not embarrassed to tell you about it, because I've had it in restaurants.  For those of you who live and die by the microwave.  Listen up.
You WILL NOT be needing Mr. Wave tonight.  Walk right past and put a small saucepan of water on the stove over medium heat and keep reading.

Lately, we seem to always have asparagus in the refrigerator.  (A sure sign that it's spring.)
You can too, if you store it the way I do.   I think I remember seeing this on an episode of  Julia Child years ago.  (I searched for it, but couldn't find it, so here's one that is just plain fun to watch.)  Depending on how large your bunch of asparagus is, use a small mixing bowl, or glass measuring cup and fill with an inch of water.  Prop up your asparagus in the water, like a bouquet of flowers and cover loosely with the plastic veggie bag you brought them home in.  They will keep like this, in your refrigerator, for at least a week.

This next part perhaps says more about us than I'm comfortable with, but what the heck.  We almost always have some prosciutto in the fridge...or, even better in my opinion, Serrano ham.  I can't explain the direct correlation between being a happy person and having prosciutto at the ready, but that's the eternal mystery of the joy of cured pork products.  They just bring Happy into the house.

So, now we have asparagus, some kind of ham deliciousness and the third component is even easier.  Eggs.  The ultimate super food.  I LOVE eggs.  Or, as Woody Allen says to Diane Keaton at some point in Annie Hall..."I luuuuurve you".   I mean 'them'.  Eggs.  You know what I mean...

These are your three main ingredients.  What you will do is roast the asparagus in a super hot oven (after tossing them with a teaspoon of olive oil and some salt and pepper) for a mere seven to eight minutes.  (If you'd like to get fancy, you may toss a small handful of chopped shallot over the asparagus in the remaining minute or two of roasting--I've talked about this before...the fragrance of roasted shallot is heavenly and totally worth keeping a couple shallots on hand at all times.)

In the meantime you will poach, or soft-boil an egg.  (My favorite methods are below.)

Open your package of ham or prosciutto and then plate things up in this order:
Asparagus.  Top with egg.  Drape the ham.  Drizzle with extra-virgin olive oil and then a sprinkle of balsamic or sherry or champagne vinegar.  (Don't mock me -- I am a vinegar freak and keep almost every variety of the stuff known to mankind on hand.)  Add a sprinkle salt and pepper, to taste.  Sometimes I even add a little dab of Dijon mustard, which then mixes into a little dressing almost when you break into the egg for that first bite.  Very tasty.

A nice crusty bread is delicious with this.  Or, if you're like me, you toast up the two-day old french loaf sitting on the counter and slather with butter.

Ta- dahhh.  YOU are now eating something delicious that did indeed only take but a few minutes to prepare, but is NOT a frozen pizza.  Just looking at this plate is enough to lift your spirits and those of your loved ones.

So, a definite yes to cooking at home... and if it's 'fast-and-easy' on occasion, that's okay by me.


Soft-Boiled Eggs 
adapted from David Tanis' A Platter of Figs
Heat a small pot of water over medium heat and when the water approaches a gentle simmer, slip the eggs carefully into the water.  Keep at just a bare simmer for 10 minutes.  Meanwhile, fill a medium mixing bowl with some ice cubes and cold water.  Remove the eggs and place into the bowl ice water.  Cool for a minute.  Take the eggs out and crack on all sides -- do not peel just yet -- before returning to the water for another couple minutes.  (This way the peel practically slides off.)  Quarter and place over your asparagus.

Poached Egg
(don't worry, it's not as tricky as you think)
Half fill a wide pan with about 4 inches of unsalted water.  Add a couple tablespoons of white vinegar, and bring to a boil.  Break an egg into a ramekin or small bowl and tip it gently into the pan at the point where the water is bubbling.  Repeat with your other eggs (but don't poach more than four at a time).  Poach for about 2 minutes.

Using a slotted spoon or small skimmer, lift out the first egg and press the outside edge lightly to check if it's cooked enough.

Poached eggs get those little extra swirls or strands of white on the outer edges so I usually put them on a plate and just trim the edges with some kitchen shears or a knife.  Voila.  The egg is ready to top your asparagus.
 
Bon Appetit Everyone!